- 2009.01.14 JSP를 이용한 JBoss의 현재 VM Memory 확인
- 2009.01.07 JBoss를 이용한 Simple Web Service 만들어보기
- 2009.01.07 JDK 1.5+ JConsole을 이용한 JBoss Monitoring
- 2009.01.06 Spring JMS Reconnect for JBoss Multiple URL
아래의 코드를 복사하셔서 web application context에 vm.jsp로 저장하신 후 확인하시면 됩니다.
<%@ page contentType="text/html; charset=euc-kr" %>
<%@ page import="java.net.InetAddress" %>
<%@ page import="java.text.*" %>
<%@ page import="java.util.*" %>
<%
if (request.getParameter("gc") != null) {
System.gc();
System.runFinalization();
}
Properties p = System.getProperties();
%>
<HTML>
<HEAD>
<META content="text/html; charset=euc-kr" http-equiv=Content-Type>
<!--META http-equiv="Refresh" content="10;url=<%= request.getRequestURI() %>"-->
<link href="style.css" rel=stylesheet type="text/css">
</HEAD>
<body leftmargin=15 topmargin=10>
<center><p>
<table width="600" cellpadding="7" cellspacing="0" border="1" bordercolordark="WHITE" bordercolorlight="BLACK">
<tr><td>
■ HOST : <%= InetAddress.getLocalHost().getHostName() %>
(<%= InetAddress.getLocalHost().getHostAddress() %>)
<% SimpleDateFormat formatter = new SimpleDateFormat("yyyy.MM.dd 'at' HH:mm:ss z", Locale.CHINA); %>
■ Current Time : <%= formatter.format(new Date()) %>
</td></tr>
<tr><td align=center>
<%
Runtime rt = Runtime.getRuntime();
long free = rt.freeMemory();
long total = rt.totalMemory();
long usedRatio = (total - free) * 100 / total;
long unusedRatio = free * 100 / total;
%>
<table width=100% bgcolor="lightgrey" border=1 cellpadding=6 cellspacing=0>
<tr>
<td align="center" colspan="2">Total Java Virual Machine Memory (<b><%= total/1024 %> KB</b>)</td>
</tr>
<tr bgcolor=#E3E3E3>
<td align="center">Used Memory (<b><%= (total - free)/1024 %> KB</b>)</td>
<td align="center">Available Memory (<b><%= free/1024 %> KB</b>)</td>
</tr>
<tr bgcolor=#E8EEEC>
<td><hr color="#CC3366" align=left size=10 width="<%= usedRatio %>%" noshade>
(<%= usedRatio %> %)</td>
<td><hr color="#0066FF" align=left size=10 width="<%= unusedRatio %>%" noshade>
(<%= unusedRatio %> %)</td>
</tr>
</table>
<p>
<a href="<%= request.getRequestURI() %>?gc=">
<img src="trash.gif" valign=middle border=0> Execution GC</a>
<a href="<%= request.getRequestURI() %>">
<img src="refresh.gif" valign=middle border=0> Reload</a>
</td></tr>
</table>
</center>
</BODY>
</HTML>
보통의 WebService예제는 vendor specific 으로 구성되어 있지만 JBoss의 특징이라면 "무조건 표준으로 간다"(워낙에 표준 준수가 심해서 가끔은 짜증이 납니다)이므로 JBoss Web Service라지만 다른 엔진 라이브러리만 있다면 아무데서나 구동될 수 있습니다.
Eclipse를 띄우고 일반 웹 애플리케이션 프로젝트를 띄운 후 JBoss library를 프로젝트의 Build Path로 지정합니다. 이 부분에 대해서는 별도 설명을 하지 않습니다.
1. Server 측 코드를 작성합니다.
package com.jboss.webservice;
import javax.jws.WebMethod;
import javax.jws.WebParam;
import javax.jws.WebService;
import javax.jws.soap.SOAPBinding;
/**
* This is a webservice class exposing a method called greet which takes a input
* parameter and greets the parameter with hello.
*
* @author Ji-Woong Choi
*/
/*
* @WebService indicates that this is webservice interface and the name
* indicates the webservice name.
*/
@WebService(name = "Hello", targetNamespace="http://client.jboss.com/", serviceName="GreetService")
/*
* @SOAPBinding indicates binding information of soap messages. Here we have
* document-literal style of webservice and the parameter style is wrapped.
*/
//@SOAPBinding(style = SOAPBinding.Style.RPC, use = SOAPBinding.Use.LITERAL, parameterStyle = SOAPBinding.ParameterStyle.WRAPPED)
@SOAPBinding(style = SOAPBinding.Style.RPC, use = SOAPBinding.Use.LITERAL)
public class Hello {
/**
* This method takes a input parameter and appends "Hello" to it and returns
* the same.
*
* @param name
* @return
*/
@WebMethod
public String greet(@WebParam(name = "name")
String name) {
System.out.println("JBoss Web Service was invoked by " + name);
return "Hello!, " + name;
}
}
Web Service Annotation을 이용하여 필요한 메소드들을 구성합니다.
2. Web.xml 파일을 편집합니다. 본 예제에서는 servlet style을 이용하여 처리합니다.
<web-app xmlns:xsi="http://www.w3.org/2001/XMLSchema-instance"
xmlns="http://java.sun.com/xml/ns/javaee"
xmlns:web="http://java.sun.com/xml/ns/javaee/web-app_2_5.xsd"
xsi:schemaLocation="http://java.sun.com/xml/ns/javaee http://java.sun.com/xml/ns/javaee/web-app_2_5.xsd"
id="WebApp_ID" version="2.5">
<display-name>jboss-ws</display-name>
<servlet>
<servlet-name>Hello</servlet-name>
<servlet-class>com.jboss.webservice.Hello</servlet-class>
<load-on-startup>1</load-on-startup>
</servlet>
<servlet-mapping>
<servlet-name>Hello</servlet-name>
<url-pattern>/Hello</url-pattern>
</servlet-mapping>
<session-config>
<session-timeout>30</session-timeout>
</session-config>
</web-app>
다른 방법으로는 EJB를 이용하여 port proxy를 remote stub을 이용하는 방법이 있지만 web이 테스트하기 보다 단순하므로 이 예제를 이용하겠습니다.
3. 서버에 디플로이 후 Web Service에 대한 deploy상태를 확인합니다.
http://localhost:8080/jbossws/ 라고 입력하면 웹서비스 리스트를 확인할 수 있습니다.

위의 화면에서 "View a list of deployed services"를 클릭하면 웹서비스들의 상태가 나타나게 됩니다.

4. WSDL의 디플로이된 상태를 확인합니다.

5. 이제 클라이언트 코드를 작성합니다. 여기서는 DII방식(Dynamic Invocation Interface) 방식을 이용하여 작성합니다.
import javax.xml.rpc.Service;
import javax.xml.rpc.ServiceFactory;
import javax.xml.rpc.Call;
import javax.xml.namespace.QName;
import java.net.URL;
public class HelloClientDII
{
public static void main(String[] args)
throws Exception
{
String urlstr = "http://localhost:8080/jboss-ws/Hello?wsdl";
String argument = "Ji-Woong";
System.out.println("Contacting webservice at " + urlstr);
URL url = new URL(urlstr);
String ns = "http://client.jboss.com/";
QName qname = new QName(ns, "GreetService");
QName port = new QName(ns, "HelloPort");
QName operation = new QName(ns, "greet");
ServiceFactory factory = ServiceFactory.newInstance();
Service service = factory.createService(url, qname);
Call call = service.createCall(port, operation);
System.out.println("hello.hello(" + argument + ")");
System.out.println("output:" + call.invoke(new Object[] {argument}));
}
}
위의 코드를 실행하면 서버에 System console에 적은 내용이 찍히게 되며, 클라이언트에서 응답을 받을 수 있습니다.
http://java.sun.com/j2se/1.5.0/docs/guide/management/agent.html
Technical Articles : http://java.sun.com/developer/technicalArticles/J2SE/jconsole.html
1. Local에서 구동중인 JBoss Server에 설정하기
JMX Agent를 Local의 JBoss 서버에 구동시키려면 다음의 java option을 run shell(run.conf/run.sh or run.bat)에 포함시켜 주시면 됩니다.
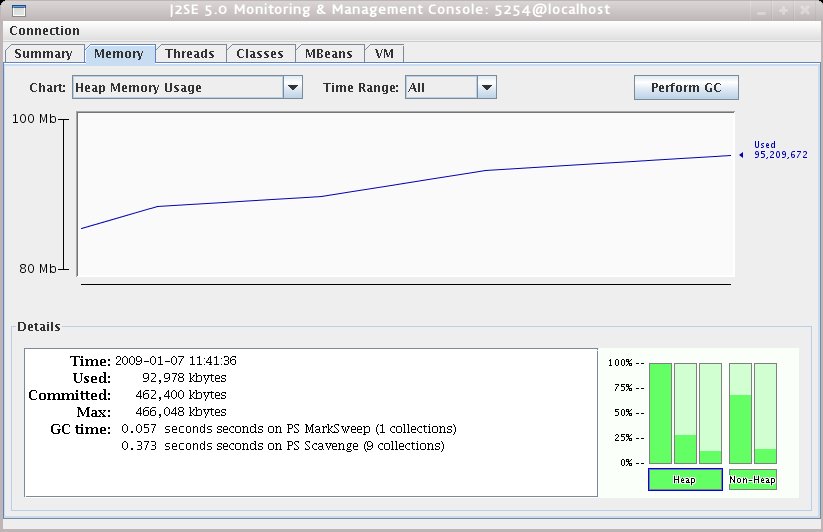
연결이 되면 아래의 그림처럼 VM 상황에 대한 자세한 정보를 확인할 수 있습니다.#
# Specify options to pass to the Java VM.
#
if [ "x$JAVA_OPTS" = "x" ]; then
JAVA_OPTS="-server -Xms128m -Xmx128m"
fi
# Enable the jconsole agent locally
JAVA_OPTS="$JAVA_OPTS -Dcom.sun.management.jmxremote"
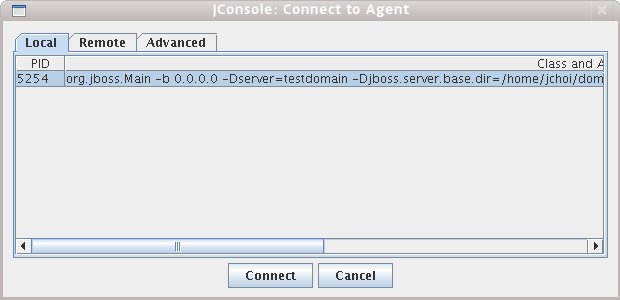
그런 다음 $JAVA_HOME/bin/jconsole을 실행시키면 다음의 화면이 나타납니다.
[jchoi@/opt/java1.5]jconsole

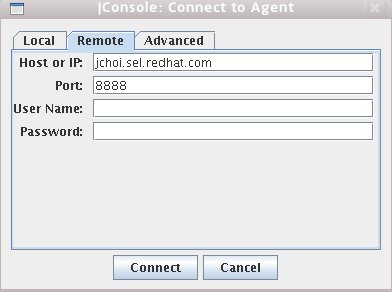
2. Remote Server에서 구동중인 JBoss Server에 설정하기
Remote라고 해서 별다른 설정이 있는 게 아닙니다. 원격에서 실행하는 JBoss Server의 옵션에 필요한 파라미터를 전달받아 JConsole을 로컬에서 실행해서 보면 됩니다.
기본적으로는 다음의 스크립트를 추가하도록 합니다.
#

# Specify options to pass to the Java VM.

#

if [ "x$JAVA_OPTS" = "x" ]; then

   JAVA_OPTS="-server -Xms128m -Xmx128m"

fi

# Enable the jconsole agent remotely on port 12345

JAVA_OPTS="$JAVA_OPTS -Dcom.sun.management.jmxremote.port=12345"
# Enable the jconsole agent remotely on port 8888

JAVA_OPTS="$JAVA_OPTS -Dcom.sun.management.jmxremote.port=8888"

JAVA_OPTS="$JAVA_OPTS -Dcom.sun.management.jmxremote.authenticate=false"

JAVA_OPTS="$JAVA_OPTS -Dcom.sun.management.jmxremote.ssl=false"

위의 설정을 이용하여 추이를 지켜본 후 Memory Leak등의 여부를 그래프로 확인해볼 수 있을 겁니다.
이 문제를 해결하기 위하여 Spring JMS의 configuration을 수정하여야 합니다. 기본적으로 Spring은 Connection URL을 여러 개(예:jnp://serverip:port,serverip:port)로 주었을 때 최초의 lookup url만을 인식하여 exception이 발생하게 됐을 경우 다른 노드가 아닌 같은 노드로의 접속만을 무한대로 시도하게 되는 단점을 가지고 있습니다(Spring 3.0 개선 가능)
이는 JBoss 뿐만 아니라 WebLogic도 같은 종류의 에러가 발생되고 있습니다. WebLogic 또한 jmsTemplate을 이용하여 URL List를 주었을 때 secondary url로 fail-over가 안되는 현상을 다음의 내용에서 확인하실 수 있습니다. (참조 : http://jira.springframework.org/browse/SPR-4720)
“I've followed this issue for few days as I face the similar problem. I came to the same workaround but it didn't work for me as I use cluster address to my weblogic cluster like t3://192.168.42.58:8001,192.168.42.58:9001
If I use single node weblogic instance, it works just fine. When I use two nodes failover still works but only when I shutdown first node and then start it again. However when I try to shutdown the first node and migrate JMS server to the second node my Spring client doesn't failover. I get this exception:
May 18, 2008 9:14:37 PM org.springframework.jms.listener.DefaultMessageListenerContainer handleListenerSetupFailure
SEVERE: Setup of JMS message listener invoker failed - trying to recover
weblogic.jms.common.JMSException: Destination not found”
이를 해결하기 위한 방법은 다음의 configuration을 Spring JMS Configuration file에 추가도록 합니다.
<bean id="jndiTemplate" class="org.springframework.jndi.JndiTemplate">
<property name="environment">
<props>
<prop key="java.naming.factory.initial">org.jnp.interfaces.NamingContextFactory</prop>
<!-- for server -->
<prop key="java.naming.provider.url">10.64.160.179:1299,10.64.160.217:1299</prop> <prop key="java.naming.factory.url.pkgs">org.jnp.interfaces:org.jboss.naming</prop>
</props>
</property>
</bean>
<bean id="jmsQueueConnectionFactory" class="org.springframework.jndi.JndiObjectFactoryBean">
<property name="jndiTemplate">
<ref bean="jndiTemplate" />
</property>
<property name="jndiName">
<value>/ConnectionFactory</value>
</property>
<property name="cache" value="false"/>
<property name="proxyInterface" value="javax.jms.ConnectionFactory"/>
<!-- Fails both with and without the following two elements defined -->
<!-- <property name="lookupOnStartup" value="false" /> -->
<!-- <property name="proxyInterface" value="javax.jms.ConnectionFactory" /> -->
<!-- END optional -->
</bean>
<property name="connectionFactory">
<ref bean="cachingConnectionFactory" />
</property>
<property name="destination"><ref bean="receiveDestination" /></property>
<property name="concurrentConsumers" value="3" />
<property name="recoveryInterval" value="2000" />
<property name="messageListener" ref="messageListener" />
</bean>
Test Sequence
1. 1번, 2번 Messaging Server를 기동시키십시오.
2. 1번의 application를 기동시키십시오. 이 때 기본적으로 1번으로 접속을 시도하게 되며 연결을 유지하게 됩니다.
3. 다음의 애플리케이션을 구동시켜 1번으로 메시지를 전송해 봅니다.
/app/test> send.sh
4. 1번의 Messaging Server를 kill.sh로 shutdown시키십시오.
5. 다음의 애플리케이션을 다시 한 번 구동시켜 메시지를 전송합니다.
/app/test> send.sh
메시지는 자동으로 83번으로 가게 되며 이미 fail-over된 tracking-server는 83번에서 메시지를 전송받게 됩니다.
위의 fail-over상황은 server의 serverlog/server.log 파일에서 debug 모드 fail-over되는 것을 확인하실 수 있습니다.


